Pages

Tuesday, September 24, 2013

Monster Crochet

It seems like forever ago that we last did a bit of crochet. 
It is a great activity when the sun has gone down and you are curled up under a cozy blanket. 
Not really a summer activity. 
But there are some exceptions...
Our neighbors just had their first child this week. Such an exciting time!
One of our favorite pastimes with them is to come over and watch Walking Dead together, so it came as no shock as to what they chose for their baby's room theme.

Monsters!

Googly-eyed, multi-armed, multi-colored cute and cuddly monsters!

So in honor of their first born, we decided to create a truly cuddly monster for their soon-to-be 'lil-monster'. 
We used their baby shower invitation for inspiration. Since we had no instructions or templates, it took us a little over a week to create, but we really enjoyed doing it.

We hope the 'lil-monster' next door will like it too.
Cannot wait to meet you little guy!

Here are a few photos of the finished product:


We used the monster at the far right in the back as the inspiration!

Tuesday, September 10, 2013

Last Minute Plans

So this past weekend, we were supposed to help a friend of ours with a bash at the beach. We were tasked with staking a claim to a fire pit in the morning and hanging around all day till everyone arrived. We have several beaches in our area with fire pits so you can do a bonfire at the beach legally. (Though not for much longer due to some recent California law changes, but that comes next year.) You can only have a fire within the concrete rings provided at the beaches, in order to keep things from getting out of hand with the crowds. We decided on a smaller beach in Corona Del Mar, thinking that it would not be super-crowded. It was only going to be about 70 degrees out, which is downright chilly for August in SoCal so we thought there weren't going to be any issues getting a fire-pit. We drove up at 9:15 am with another friend in tow and discovered that all of the rings were already claimed. Just our luck.


Not wanting to miss out on all the s'mores our friend was bringing and with some quick thinking by the hubby, we came up with an alternative plan. We offered up our home for the party and since everyone was expecting a fire, we would offer one of those too.
Our backyard is currently in transition from a yard full of weeds to our own personal playground, but we are a few years away from full completion. One thing we have a lot of is open dirt and concrete chunks. The concrete was from the patio that used to sit just outside the back doors that we decided to jack-hammer out one day. We have been slowly trying to recycle or trash the concrete chunks. They actually constitute most of our pathways at the moment but making big chunks into little rocks is hard and tedious work. Needless to say, we have extra.

The day of jack-hammering... It feels so long ago.

Since we had so much concrete left, my hubby though that it would make a great material for a fire pit ring. Armed with nothing but some gloves and our wheelbarrow, he set about making the ring in our large expanse of dirt whilst I set about prepping some food and drinks for the party.
In little under an hour, he had everything set-up, including a little cooking area using a leftover grill from an older camp stove.


After everyone arrived and the sun set, we started up the fire and settled in. There were plenty of s'mores for everyone because what is a bonfire without s'mores?
Everything may have smelled like a camp-fire once it was all over but at least the party went on!


We hope everyone had a great time! We did!

Thursday, August 22, 2013

Shade Structure

Our backyard is quite a large space. Once covered in a small concrete slab and lots of knee-high weeds, we have since started transforming it into our own personal playground.


 This whole transformation is only about half way done. We have the vegetable and herb garden and earlier this year we put in a lawn for the pups to run around on. One of the first things we did, after finishing with the garden, was to plant some fruit and nut trees. We are in desperate need for shade in this yard since only two years ago nothing was growing back there taller than 3 feet from the ground.


The trees have since taken off, especially our pecan tree, but we decided to get some more help in the shade department. After a quick look on Amazon, we found a simple square shade sail that fit perfectly between the house and the edge of the lawn. 
We knew this would be a great addition to the backyard for all of our get together's.
We started by embedding some landscaping posts into the ground and mounting some eye-screws to the tops of them to create the other two anchor points away from the house.


Add a couple of carabiners and we are in business!  


Ain't she a beaut? Only took us a few hours (and we only had to buy one auger attachment from Lowe's to dig the holes). 
FYI, the shade you see in the photos are from our neighbor's yard. Thanks guys!

Tuesday, July 9, 2013

Alternative Home Watering for the Lazy and Forgetful

If you have ever had a beloved (or, let's face it, forgotten) houseplant die on you while you were away on vacation, you will want to read on. 

We have a great garden in our backyard but don't for a second think that we have the time to go out there everyday and water every plant. We have anywhere from 20 to 40 different varieties of plants out there, not to mention our fruit and nut trees. It would be very inefficient and time consuming to water with a hose, so we spent quite a bit of time when we set up our garden to create an automated drip irrigation system.

With potted plants, indoor or outdoor, you generally have to rely on hand watering from a can or hose. But why couldn't we do the something similar with our potted plants that we do with our in-ground garden?

What do you do when you have to leave your precious potted plants for a few days or what happens when you cannot seem to remember how often to water your plants?

Lets look at some of the options that we were able to find online.

Here is a tried and true stand-by. The inverted staked water-er. Plunge the stake end into the soil of the potted plant and fill the tube with water.


We wanted to see if we were just trying to "re-invent the wheel" so we were sure to buy a pre-manufactured pot that claimed to be "self-watering".
Here is a simple version that we found at Walmart where you simply pot your plant and add water down into the base compartment.


The next option we looked at was an interesting idea of creating a well of water in direct contact with the dirt at the base of the pot.
We start with two nesting containers, a plastic water bottle, a few big rubber bands, a utility knife and a power drill. 


Our container nested a bit too well. There was not enough room between the two containers for any sizable amount of water so we added a few rubber bands to shift the inner container upwards a bit. We had about and inch or so of space at the bottom. 


Take the inner container and invert it on a steady platform (not the carpet like we did). We cut the empty water bottle in half and placed the cut edge on the bottom of the inverted container to be used as a stencil. 


Use the power drill to start the hole and the utilize knife to clean out the bottom of the inner container.


Take the bottom of the cut water bottle and poke several holes in it. Place it into the bottom of the cut container with the opening facing the top of the container. This inner container/water bottle contraption will be filled with soil and draw the water through the holes in the cut water bottle.


Next, we had to figure out how to refill the water reservoir without taking the whole thing apart. We decided to create a hole in the cap of the inner container with which to run a flexible tube from the top to the bottom of the outer container.


Be sure to cut a hole for your plant as well. This one was a little hard to fill with dirt, but was fully contained and did not have to be taken apart every time you had to fill the water reservoir.
The cap is optional. You could just as easily fill the soil around the tube without placing the cap on top.


And you are set to go.

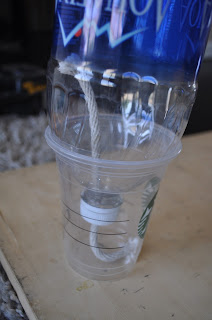
When we were doing our research for these watering systems, capillary action came up often. This Next option shown here has a water reservoir at the base with the container of soil directly above. A water soaked rope runs from the bottom of the soil-filled container and into the water reservoir below.


You will need a large empty plastic bottle with the bottom trimmed off, a length of cotton rope, a cup to fit the inverted bottle and a few tools. We used scissors and our trusty power drill.


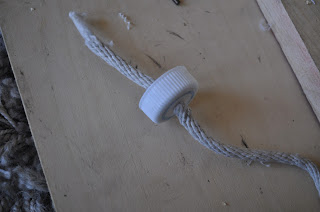
First, drill a hole into the cap of the plastic bottle big enough to push the rope through.


We taped the end of the rope into a tapered shape in order to get the rope to fit snugly in the hole.


Next, trim the rope so that it will have around 3-4 inches on either side of the cap. Place the cap back on the bottle and invert the bottle into the cup. Fill the cup with water and the inverted bottle with soil and you are ready for a plant.

The last system we found that utilized capillary action, consisted of a water soaked rope wrapping the interior of the planter with the other end in a container of water (whether it is in the planter or outside of it).


Start with a standard pot (we got ours at Ikea), a length of cotton rope, a small refillable container and a pair of scissors.


Don't get thrown by the color of the pot, we changed our minds part way through and went with a simple green pot from Target. We had other plans for the white one.
You want the rope to be situated about mid-height in the pot. We recommend only wrapping it once around the circumference of the pot. Too many times around and you will need to be out there everyday to refill the reservoir and that is not the point of this exercise. 
Take the end of the rope coming out of the pot and insert it into the refillable container. The rope works best when pre-soaked.


After we had all five pots ready to go, we started planting. We are trying to propagate our lavender and some other herbs so we planted some cuttings. We filled up all the water reservoirs and waited to see what would happen.

Every day for a week, we checked the water levels and the soil moisture to see which setup did the best.

Here is the list from best to worst:

1. Wrapped Rope Capillary Pot
2. Inverted Staked Water-er
3. Pre-Manufactured Self-Watering Pot
4. Inverted Bottle Capillary Pot
5. Nested Container Pot

By the end of the week, there was algae growing the bottom of the nested containers. Nasty...
The wrapped rope pot did the best by far. If you find a big enough water reservoir, you may only need to water once a week. Sounds perfect for a forgetful indoor gardener!

Now repeat after me...No more dead plants! 

Now go out there and buy that cute little plant you have been eyeing but thought that you would kill inside a month. You can do it this time because now you have a plan.
Place it in a bright windowsill and setup one of our top three watering systems and you will have beautiful plants all year long! Throw in a little plant food every once and a while and your plants will love you even more.

Now go out there and surround your live with a bit of greenery!

Thursday, June 13, 2013

Ottoman/ Coffee Table

My husband has been angling for a new coffee table ever since...well, ever since he lost the battle for  choosing the first one.

Our current table was looking a bit worn and dinged up, so I gave him free reign to come up with our next one. He had pinned this DIY Ikea table blog a while back and it seemed like a good fit for our living room.

Ikea Lack side table upholstered ottomans

 You can follow the link to the original blog by clicking on the picture above.


First, we started with one of the Lack Ikea tables for $8-$10. The black/brown color that matches our tv stand was the more expensive of the two (a fact that we learned only after we walked 3.75 miles around a one-way Ikea-shaped maze).


The other blogs we researched showed how to cut the foam from large sheets sold at Home Depot, in order to save money; however, what we didn't like was the wasted foam edges. Enter Joanns! During one of our weekly trips, we noticed they stocked pre-cut foam,and best of all, the size was almost perfect! (the lack table is 21-5/8" x 21-5/8", and the foam was 22" x 22") We decided on the high-density version of the foam as it would deflect less for placing plates and glasses on it.


After aligning the foam and table top, we discovered that the slight difference in size gave the table a flared effect which we kind of liked. We used a spray adhesive to fix the foam to the tabletop, which provides a secure fit.


Need to be sure that it is comfortable... ahhh!

Next, we bought some batting to soften the edges of the foam and the tabletop.


We used the staple gun to mount the batting on the underside of the table.


Be sure to trim the excess batting on all edges and around the mounting holes for the legs.


Next we chose a heavy duty fabric to finish the ottoman.


We started stapling the material on one edge. Then pull the material taut opposite the first side and staple into place. Be sure the material is being pulled evenly so you do not end up with any strange creases in the top.


My hubby knows his way around a staple gun!

How to finish the last two sides? Here are a series of pictures showing how we folded the corners to ensure a smooth and neat finish.


First we pulled the material flat around the corner.


We stapled the material down to the corner to fix it into place.


Next we pulled the material taut along its long edge.

  
We folded the material along the edge of the corner.


We then folded the material over to the bottom of the tabletop.


Staple in place.


Repeat on last side.


Be sure to trim the excess material away and the clear the material from the mounting holes for the legs. We had to use a utility knife and a hole punch to clear the holes sufficiently.
Next, mount the legs according to the IKEA instructions.


We chose to cut our legs shorter to match the height of our couch. FYI, the insides of the LACK legs are hollow. If you want to prevent the legs from scratching your floors, you may want to look into using adhesive furniture pads or cork boards. Ours are on a carpet, so it was not an issue for us.

These work great as an ottoman, a coffee table or even a stool (though IKEA would disagree).
They are very functional and a great addition to our living room decor.