If you have ever had a beloved (or, let's face it, forgotten) houseplant die on you while you were away on vacation, you will want to read on.
We have a great garden in our backyard but don't for a second think that we have the time to go out there everyday and water every plant. We have anywhere from 20 to 40 different varieties of plants out there, not to mention our fruit and nut trees. It would be very inefficient and time consuming to water with a hose, so we spent quite a bit of time when we set up our garden to create an automated drip irrigation system.
With potted plants, indoor or outdoor, you generally have to rely on hand watering from a can or hose. But why couldn't we do the something similar with our potted plants that we do with our in-ground garden?
What do you do when you have to leave your precious potted plants for a few days or what happens when you cannot seem to remember how often to water your plants?
Lets look at some of the options that we were able to find online.
Here is a tried and true stand-by. The inverted staked water-er. Plunge the stake end into the soil of the potted plant and fill the tube with water.
We wanted to see if we were just trying to "re-invent the wheel" so we were sure to buy a pre-manufactured pot that claimed to be "self-watering".
Here is a simple version that we found at Walmart where you simply pot your plant and add water down into the base compartment.
The next option we looked at was an interesting idea of creating a well of water in direct contact with the dirt at the base of the pot.
We start with two nesting containers, a plastic water bottle, a few big rubber bands, a utility knife and a power drill.
Our container nested a bit too well. There was not enough room between the two containers for any sizable amount of water so we added a few rubber bands to shift the inner container upwards a bit. We had about and inch or so of space at the bottom.
Take the inner container and invert it on a steady platform (not the carpet like we did). We cut the empty water bottle in half and placed the cut edge on the bottom of the inverted container to be used as a stencil.
Use the power drill to start the hole and the utilize knife to clean out the bottom of the inner container.
Take the bottom of the cut water bottle and poke several holes in it. Place it into the bottom of the cut container with the opening facing the top of the container. This inner container/water bottle contraption will be filled with soil and draw the water through the holes in the cut water bottle.
Next, we had to figure out how to refill the water reservoir without taking the whole thing apart. We decided to create a hole in the cap of the inner container with which to run a flexible tube from the top to the bottom of the outer container.
Be sure to cut a hole for your plant as well. This one was a little hard to fill with dirt, but was fully contained and did not have to be taken apart every time you had to fill the water reservoir.
The cap is optional. You could just as easily fill the soil around the tube without placing the cap on top.
And you are set to go.
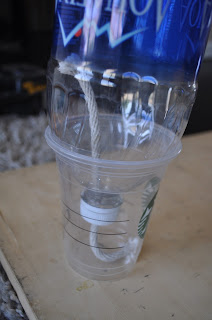
When we were doing our research for these watering systems, capillary action came up often. This Next option shown here has a water reservoir at the base with the container of soil directly above. A water soaked rope runs from the bottom of the soil-filled container and into the water reservoir below.
You will need a large empty plastic bottle with the bottom trimmed off, a length of cotton rope, a cup to fit the inverted bottle and a few tools. We used scissors and our trusty power drill.
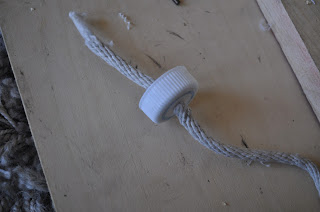
First, drill a hole into the cap of the plastic bottle big enough to push the rope through.
We taped the end of the rope into a tapered shape in order to get the rope to fit snugly in the hole.
Next, trim the rope so that it will have around 3-4 inches on either side of the cap. Place the cap back on the bottle and invert the bottle into the cup. Fill the cup with water and the inverted bottle with soil and you are ready for a plant.
The last system we found that utilized capillary action, consisted of a water soaked rope wrapping the interior of the planter with the other end in a container of water (whether it is in the planter or outside of it).
Start with a standard pot (we got ours at Ikea), a length of cotton rope, a small refillable container and a pair of scissors.
Don't get thrown by the color of the pot, we changed our minds part way through and went with a simple green pot from Target. We had other plans for the white one.
You want the rope to be situated about mid-height in the pot. We recommend only wrapping it once around the circumference of the pot. Too many times around and you will need to be out there everyday to refill the reservoir and that is not the point of this exercise.
Take the end of the rope coming out of the pot and insert it into the refillable container. The rope works best when pre-soaked.
After we had all five pots ready to go, we started planting. We are trying to propagate our lavender and some other herbs so we planted some cuttings. We filled up all the water reservoirs and waited to see what would happen.
Every day for a week, we checked the water levels and the soil moisture to see which setup did the best.
Here is the list from best to worst:
1. Wrapped Rope Capillary Pot
2. Inverted Staked Water-er
3. Pre-Manufactured Self-Watering Pot
4. Inverted Bottle Capillary Pot
5. Nested Container Pot
By the end of the week, there was algae growing the bottom of the nested containers. Nasty...
The wrapped rope pot did the best by far. If you find a big enough water reservoir, you may only need to water once a week. Sounds perfect for a forgetful indoor gardener!
Now repeat after me...No more dead plants!
Now go out there and buy that cute little plant you have been eyeing but thought that you would kill inside a month. You can do it this time because now you have a plan.
Place it in a bright windowsill and setup one of our top three watering systems and you will have beautiful plants all year long! Throw in a little plant food every once and a while and your plants will love you even more.
Now go out there and surround your live with a bit of greenery!


