Pages

Tuesday, April 2, 2013

Ladybug House

Spring is in the air and now it is time to turn our attention back to our gardens! 

Summer fruits and vegetables are so tantalizingly close! 
(We are looking at you heirloom tomatoes...)

It is not only important to pick the right kind of plants, setup an efficient watering system and remove all the weeds from our overgrown gardens, but you also have to think about attracting beneficial bugs to your own little slice of Eden.

Ladybugs are a great example of a beneficial bug for your garden. They and their offspring love to munch up lots of those nasty aphids without harming your plants.

You can purchase ladybugs from your local gardening center (call before you go since there is a very small window for ladybug sales and not everyone carries them).
But what makes the ladybugs want to hunker-down and stay a while instead of flying away once you let them loose? 

Unfortunately...
Not much.

But maybe we can 'sweeten the pot' (or garden, in this case) by making them a nice house to live in. We found the following link to Martha Stewart online for this great little "cottage".

lady-bug-habitat-md107956.jpg

And we are underway!

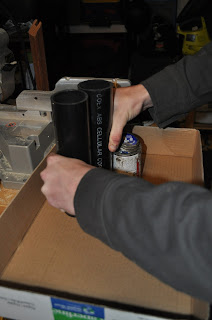
We started by cutting down some 2" to 2 1/2" diameter PVC plumbing pipes we had laying around. We chose black since it does better in the sun though we painted ours so that did not matter as much.
You may chose to make yours out of wood or metal, but most of all, be sure that it is waterproof.


We cut the pipes into three pieces, each the same length. Ours were between 10" to a foot. You can do any number of pipes that you want, depending on how big you want the ladybug house.


Next step was to glue them all together with PVC glue (we use Christy's Red Hot Blue Glue). 


My husband wanted to keep them aligned to one side so he would periodically press the pieces on end down on his workbench. He is kind of a perfectionist when it comes to our projects.


Since we had a specific kind of paint job in mind, we made sure to pay attention to how our pipes lined up with one another. We wanted more of the printed text to be on the bottom of our triangular house so as not to be seen later on. Can you guess what are paint job looked like without skipping to the end?


Once all the pieces were glued together, we cut out some painter's tape to create spots for our 'ladybug' house. Be careful not to cover up any of the text with the tape since we will not be painting any of these spots later. At least if we can help it.


A little bit of spray paint later and you are nearly finished! Before the paint fully dries, remove the painter's tape spots. To complete the look, add some sticks (we used bamboo) to provide some nooks and crannies where the ladybugs can nestle into.


In the end, you can choose to hang yours (a simple string through one of the pipes would do) or just place it somewhere off the ground in your garden. Since we do not have any place from which to hang our little project, it has taken up residence on our garden fence.


We hope lots of ladybugs will grace your garden this year and for many years to come!
Look out aphids!

Tuesday, March 19, 2013

Kitchen Aid Cover

I bought my Kitchen Aid mixer when I was about 12 years old. 

It was the day after Christmas and I had a coupon and a mission.

It is one of those plain white ones with the front attachment for all those great extras (meat grinder, pasta press, etc.). If I bought it today, it would be a lot more colorful. Maybe like this one...

star wars boba_fett_mixer_by_tommyfilth

It is all kinds of awesome! Right?

I love cooking, something I picked up from my parents and grandparents and that Kitchen Aid mixer was always one of my prized possessions.
So it was inevitable that my mixer would take up permanent residence on the kitchen counter in our home. The only issue was that being so close to our stove (that gets used just about every night) made sure that there was grime over it all the time.


Plus, with all the attachments that we have for it, it was not very pretty to look at. Very disorganized looking, plus all the grease and grime that got on it made sure that we would have to wash them twice every time we had to use them (once before and once after).

I hate having to wash more dishes...
But who does?

First we had to select a fabric. Something timeless, classic and blue to match our kitchen walls.


Then we had to square up the fabric. A square is really useful for this, though ours is not quite big enough for this large piece of fabric.


We used the pattern and a straight edge to even everything out. Though don't be discouraged if it is not totally straight. Not all fabric prints are printed entirely even. Ironing will help.


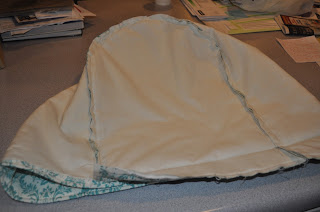
The patterned fabric is the outside material; what you will look at everyday. The inside material is just a simple muslin, something easily washable. To give the whole thing some stiffness we went with some thin batting between the two fabrics. We did not want the whole thing to sag too much.


The basic shapes for the construction of the cover consisted of two squares and two rectangles for the ends with rounded tops. We based them off of the dimensions of my mixer allowing for a quarter inch all around for a clean edge and for attaching them together.


Each piece was squared up and pinned together with all three materials. I then buzzed all the edges together with white thread on my sewing machine making the four shapes into panels.


I then pinned the matching edges of the panels together and started buzzing them together. I would pin the straight edges together first and then pin the rounded tops in sections to get the curve right.


Once all the panels are pieced together you can try the size out on the machine itself. Mine was a bit short of the base, which worked pretty well for us. The last touch was to pin up the bottom edge to even it out and cut off the excess material. 


And viola! Fin. Belissimo!


So beautiful! And now we can at least look a little like we are a little bit organized.
Baby steps...


Tuesday, March 5, 2013

Word Scarf

We found this link on Pinterest for a cute scarf that was just the perfect idea for a friend of ours.
Just take a plain scarf and a fabric pen (Tea-Juice was used in this one) and write your own words (a poem or quote are just a few suggestions).

So cool! Buy a plain white scarf. Write a quote or lyrics from a song on it and when you wear it only you know what it says. Would be cool as a gift.

We had two of our married friends visit with us at our home over last October. We showed them all over Southern California, sharing our favorite places with them. They are from "wooly Wales" as they like to say and we thought we would cram as much sun and fun into their holiday.

To remember all of the great places and fun times we had, this scarf was the perfect gift!

Instead of a poem, we wrote down all the places that we visited with them over the holiday.


My handwriting is not perfect but it does not matter much with this project. It is very forgiving...


Once it is all bunched up, it is harder to read, but still very cute. 
Just a little reminder of a great time with friends.


We miss you guys!